RouterOS:MikroTik設定WireGuard VPN
前陣子剛好有需要透過家裡的VPN進行一些工作,這篇文章在此紀錄在MikroTik路由器裡面設定WireGuard VPN的過程。在這裡我全程都是以WebFig介面的角度出來撰寫。
MikroTik WireGuard VPN規劃與設定
- VPN 伺服器(路由器)IP:10.0.0.1(網段遮罩:10.0.0.1/24)
- VPN 客戶端 IP 範圍:10.0.0.2 ~ 10.0.0.254
- 家裡設備網段(LAN):192.168.2.0/24
Step 1. 設定DDNS
除非你去申請固定IP,否則就需要設定DDNS來讓每次你要連回家的時候,都知道要連線到哪個IP位址。
- 點選左側
IP->Cloud。 - 勾選
DDNS Enabled並點選Apply。 - 記下DNS Name,假設是
slashview.sn.mynetname.net。
Step 2. 建立WireGuard介面
WireGuard->WireGuard標籤頁->Add New。- Name:
SlashView-VPN, Listen Port:51820。 - 點選Apply,接著重新點開Slash-HomeVPN項目,複製
Public Key,假設是ServerPublic123。
Step 3. 設定VPN介面IP地址
IP->Addresses->Add New。- Address:
10.0.0.1/24。 - Interface:選擇
SlashView-VPN。
Step 4. 設定防火牆
** 允許外部WireGuard連入 **
- 點擊
IP->Firewall->Filter Rules->Add New。 - Chain:
input, Protocol:udp, Dst. Port:51820。 - Action:
accept。
** 允許VPN流量存取內網 **
- 再次點擊
Add New。 - Chain:
forward, In. Interface:SlashView-VPN。 - Action:
accept。
✅ 重要:記得要把這兩條規則都拖曳到防火牆的頂端。
Step 5. WireGuard客戶端設定
- 至WireGuard官方安裝頁面下載程式並安裝。
- 點擊
新增隧道右側下拉箭頭,選擇新增隧道精靈。 - 系統會自動生成
Private Key,並請複製視窗上方的Public Key,假設是ClientPublic456。 - 將下方的程式碼貼上到WireGuard的設定視窗裡面,提供兩種模式切換,請自行依據需求切換註解即可:
[Interface]
PrivateKey = 自動產生的私鑰
Address = 10.0.0.2/32
DNS = 10.0.0.1

[Peer]
PublicKey = ServerPublic123
# 流量模式切換
# Mode A(全流模式:翻牆):
AllowedIPs = 0.0.0.0/0
# Mode B(分流模式:僅連內網):
# AllowedIPs = 10.0.0.0/24, 192.168.2.0/24

Endpoint = slashview.sn.mynetname.net:51820
PersistentKeepalive = 25
Step 6. 回到路由器設定Peer
做到這裡你就會明白為何WireGuard安全如此的高了,就是因為他連鑰匙都沒辦法透過遠端傳輸,你必須要事先在雙端路由器上面設定好Public Key這樣才能建立連線,這種毫無彈性的工程師思維真是廢到想笑。(所以這也意味著你最好把Client端設定檔好好保留起來)
WireGuard->Peers->Add New。- Interface:
SlashView-VPN。 - Public Key:
ClientPublic456。 - Allowed Address:
10.0.0.2/32。 - 點選
OK。
Step 7. 回到WireGuard客戶端測試連線狀況
- 點選你剛才設定的隧道名稱,然後點選
連線按鈕。 - 如果確定有建立連線成功,流量的地方會顯示
已收到和已傳送的數據量,如果有0出現表示連線尚未成功。
補充:網路開機封包
有時候你需要在VPN連線的狀態下,從外部透過網路開機封包啟動家裡的電腦,透過MikroTik路由器內建的Tools > WOL功能需要實際去背誦MAC位址顯得很搞笑之外,如果我們想要透過程式碼針對記憶在程式碼裡面的MAC發送網路開機封包一樣辦不到,因為VPN IP(10.0.0.xx)與內網IP(192.168.2.xx)先天的限制,導致沒有辦法跨越網段發送MAC封包。
這時候我們可以透過在路由器上面設定一個靜態ARP來讓路由器透過某內網IP對應廣播MAC位址,這樣就可以透過VPN IP來轉發網路開機封包了。我們可以從下列路徑進入設定:IP > ARP > Add New,設定如下圖之屬性:
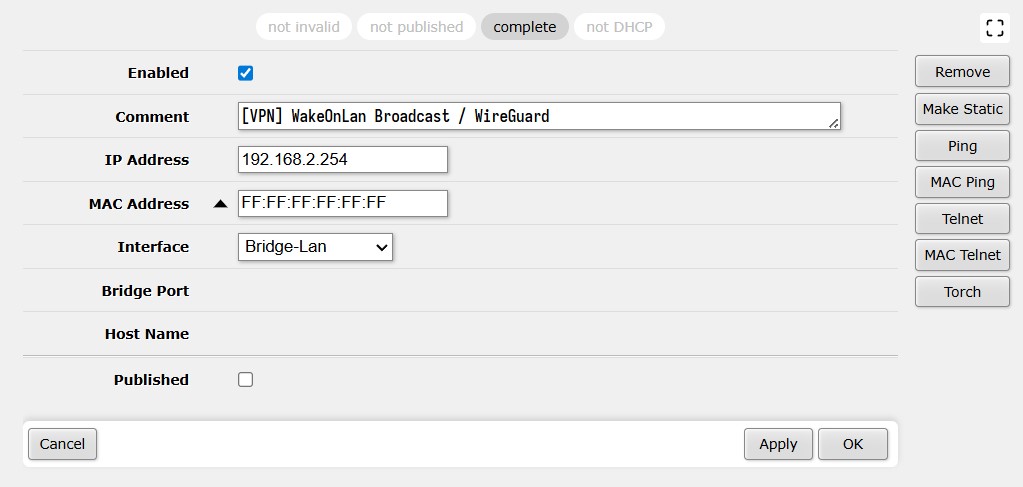
透過上圖的規則,搭配Step 4設定的跨網段防火牆forward轉發,就可以針對例如192.168.2.254內網IP發送網路開機封包,他會幫我們把封包廣播到FF:FF:FF:FF:FF:FF全部內網,自然程式碼中對應的MAC機器就可以收到這組封包了。
發送封包的程式碼可以參考下方Powershell(採用NerdFont字形):
try {
[System.Console]::CursorVisible = $false
$aryHosts = @(
[pscustomobject]@{cName = "SomePC via LAN"; cMac = "xx-xx-xx-xx-xx-xx"; cIcon = ""; cIP = "255.255.255.255"}
[pscustomobject]@{cName = "SomePC via VPN"; cMac = "xx-xx-xx-xx-xx-xx"; cIcon = ""; cIP = "192.168.2.254"}
)
$aryMenuItems = @($aryHosts)
$aryMenuItems += [pscustomobject]@{cName = "Exit"; cMac = "EXIT"; cIcon = ""; cIP = ""}
function GetLocalIp {
try {
$oUdp = [System.Net.Sockets.UdpClient]::new()
$oUdp.Connect("8.8.8.8", 53)
$oEndPoint = $oUdp.Client.LocalEndPoint -as [System.Net.IPEndPoint]
return $oEndPoint.Address.ToString()
}
catch {
return "Unknown"
}
finally {
if ($oUdp -ne $null) {
$oUdp.Close()
$oUdp.Dispose()
}
}
}
function SendWakeOnLan {
param(
[Parameter(Mandatory=$true)]
[string]$cMac,
[Parameter(Mandatory=$true)]
[string]$cIP
)
$aryMacByte = $cMac.Split("-:") | ForEach-Object { [System.Convert]::ToByte($_, 16) }
$aryPacket = [byte[]](@(0xff) * 6 + $aryMacByte * 16)
$cLocalIP = GetLocalIp
$oUdp = New-Object System.Net.Sockets.UdpClient
$oUdp.Connect($cIP, 9)
[void]$oUdp.Send($aryPacket, $aryPacket.Length)
$oUdp.Close()
Write-Host ""
Write-Host " Magic Packet has been sent from " -ForegroundColor Green -NoNewline
Write-Host $cLocalIP -ForegroundColor Yellow -NoNewline
Write-Host " to " -ForegroundColor Green -NoNewline
Write-Host $cIP -ForegroundColor Yellow
Write-Host " MAC: " -ForegroundColor Green -NoNewline
Write-Host $cMac -ForegroundColor Cyan
}
$iSelectedIndex = 0
while ($true) {
Clear-Host
Write-Host "╭─────────────────────────────────────╮" -ForegroundColor Cyan
Write-Host "│" -ForegroundColor Cyan -NoNewline
Write-Host " WOL Remote Boot Management " -ForegroundColor White -NoNewline
Write-Host "│" -ForegroundColor Cyan
Write-Host "╰─────────────────────────────────────╯" -ForegroundColor Cyan
for ($iIndex = 0; $iIndex -lt $aryMenuItems.Count; $iIndex++) {
if ($aryMenuItems[$iIndex].cMac -eq "EXIT") {
Write-Host ""
}
$cIconPart = " $($aryMenuItems[$iIndex].cIcon) "
$cNamePart = "$($aryMenuItems[$iIndex].cName) ".PadRight(33)
if ($iIndex -eq $iSelectedIndex) {
Write-Host " " -ForegroundColor Yellow -NoNewline
Write-Host $cIconPart -BackgroundColor DarkCyan -ForegroundColor Yellow -NoNewline
Write-Host $cNamePart -BackgroundColor DarkCyan -ForegroundColor White
} else {
Write-Host " " -NoNewline
Write-Host $cIconPart -ForegroundColor Yellow -NoNewline
Write-Host $cNamePart -ForegroundColor Gray
}
}
Write-Host "───────────────────────────────────────" -ForegroundColor DarkGray
Write-Host " Use to move, Enter to select" -ForegroundColor DarkGray
if ($oKey = [System.Console]::ReadKey($true)) {
if ($oKey.Key -eq [System.ConsoleKey]::UpArrow) {
$iSelectedIndex--
if ($iSelectedIndex -lt 0) { $iSelectedIndex = $aryMenuItems.Count - 1 }
} elseif ($oKey.Key -eq [System.ConsoleKey]::DownArrow) {
$iSelectedIndex++
if ($iSelectedIndex -ge $aryMenuItems.Count) { $iSelectedIndex = 0 }
} elseif ($oKey.Key -eq [System.ConsoleKey]::Enter) {
$oTarget = $aryMenuItems[$iSelectedIndex]
if ($oTarget.cMac -eq "EXIT") {
Write-Host ""
Write-Host " Program terminated." -ForegroundColor DarkGray
break
} else {
Write-Host ""
Write-Host " Waking up: $($oTarget.cName)..." -ForegroundColor Red
SendWakeOnLan -cMac $oTarget.cMac -cIP $oTarget.cIP
Start-Sleep -Seconds 20
}
}
}
}
}
catch {
Write-Host ""
Write-Host " An error occurred during execution:" -ForegroundColor Red
Write-Host " $($_.Exception.Message)" -ForegroundColor Red
Write-Host ""
Read-Host " Press Enter to exit"
}
finally {
[System.Console]::CursorVisible = $true
}
相關參考
- RouterOS:MikroTik路由器的接入寬頻電信PPPoE的設定
- RouterOS:MikroTik路由器的安全設定、設定檔備份還原與韌體升降級的方法
- RouterOS:MikroTik路由器觀測相關數據
- RouterOS:MikroTik路由器自定義網址(Static DNS)
- RouterOS:MikroTik路由器開設SMB網路儲存區
- RouterOS:MikroTik路由器到網路設備之間的頻寬、速度測試
- RouterOS:MikroTik設定WireGuard VPN